


Are you looking to upgrade your lighting to be more energy-efficient and environmentally friendly?
LED retrofit lights might be the solution you need. In this article, we will discuss the benefits of changing to LED retrofit lights, the tools you will need for the job, and a step-by-step guide on how to make the switch.
We will also provide some tips to ensure a successful installation and discuss the proper way to dispose of your old LED retrofit lights. Let’s get started!
What Is An LED Retrofit Light?
An LED Retrofit Light is a type of lighting that involves replacing old incandescent bulbs or outdated fixtures with new LED versions to enhance energy efficiency and lighting quality. LED lights are known for their longevity and energy-saving features.
LED retrofit lights provide numerous benefits beyond just energy efficiency and longevity. One significant advantage is the improved quality of light that LED options offer, with bright, clear illumination that can enhance the ambiance of any space. LED lights emit little heat, making them safer to use and reducing the risk of fire hazards commonly associated with traditional incandescent bulbs. Another benefit is the decreased maintenance costs associated with LED lighting, as they have a longer lifespan and require less frequent replacement compared to incandescent bulbs.
Dig deeper: What Is LED Linear Lighting
Why Would You Want To Change Your LED Retrofit Light?
Changing your LED Retrofit Light can offer several advantages, including improved energy efficiency, enhanced lighting quality, and longer lifespan compared to traditional incandescent bulbs. Upgrading to LED lights can also provide better illumination and lower energy costs over time.
LED technology is known for its eco-friendly properties, as these lights do not contain harmful substances like mercury commonly found in fluorescent bulbs. This makes them safer for the environment and human health.
LED retrofit lights have the ability to be dimmable, allowing you to adjust the light intensity based on your preferences and needs. This flexibility can create a more comfortable and customisable lighting experience in your home or workspace.
To Upgrade To More Energy-Efficient Lighting
Upgrading to more energy-efficient lighting, such as LED bulbs, can significantly reduce electricity consumption and lower utility bills. LED lights are known for their energy-saving capabilities and long lifespan, making them a cost-effective lighting choice for both residential and commercial applications.
LED bulbs not only consume up to 75% less energy than traditional incandescent bulbs but also emit very little heat, reducing the strain on cooling systems and improving overall energy efficiency. The long lifespan of LED lights means less frequent replacements, saving money on maintenance costs in the long run. By making the switch to LED lighting, households and businesses can enjoy brighter, more consistent light output and contribute positively to environmental sustainability by reducing carbon emissions and minimising waste.
To Change The Colour Temperature
Changing the colour temperature of LED lights can transform the ambience of a space. Whether you prefer a warm white glow for a cosy atmosphere or a cool white light for a more vibrant and modern look, LED lights offer versatile options to suit your lighting preferences.
Warm white LED lights emit a soft, inviting glow, making them perfect for areas where you want to create a relaxing and comfortable environment, such as living rooms or bedrooms. On the other hand, cool white LEDs provide a crisp, energizing light that works well in workspaces or kitchens, where clarity and focus are essential.
When deciding on the colour temperature for your lighting, consider the functionality and mood of the space. Warm white tones are ideal for creating a cosy and intimate atmosphere, while cool white tones are better suited for areas that require task lighting or a more lively ambience.
To Replace A Damaged Light
Replacing a damaged LED light or an old bulb with a new LED bulb can enhance safety and prevent potential electrical issues. It is crucial to address any damaged lighting fittings promptly to maintain a well-lit and secure environment.
LED bulbs are known for their energy efficiency and long lifespan, making them a popular choice for home and commercial lighting.
When replacing a faulty LED bulb, ensure the power source is switched off to avoid any electrical shocks. Look for signs of physical damage such as cracks or burn marks on the bulb itself or the surrounding fitting.
Regularly checking and maintaining all lighting fittings can prevent flickering lights or sudden power outages, reducing the risk of fire hazards and electrical malfunctions.
What Tools Do You Need To Change An LED Retrofit Light?
Changing an LED Retrofit Light requires specific tools such as safety glasses to protect your eyes, a utility knife for precise cutting, and a voltage tester to ensure safety when working around electrical components.
Having a screwdriver set with various heads is crucial for dismantling and reassembling the light fittings. A pair of needle-nose pliers can assist in securing connections and manipulating wires. It is also advisable to have wire strippers to properly uncover the wire for connections.
Safety gear should always be worn, including insulated gloves to protect against shocks, and non-slip work gloves for a better hold. A robust ladder or step stool is essential for accessing high-up fixtures securely. Having a fire extinguisher close by is a sensible precaution in the event of electrical accidents.
How Do You Change An LED Retrofit Light?
Changing an LED Retrofit Light involves a series of steps to ensure a safe and efficient installation process. It is crucial to start by turning off the power at the circuit breaker to prevent any electrical accidents or circuit shorts.
- After safely turning off the power, use a ladder to access the existing light fitting. Make sure to have all the necessary tools handy, including a screwdriver and possibly a voltage tester to double-check that the power is indeed off.
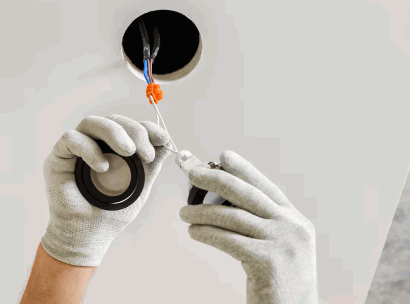
- Once you have confirmed that the power is disconnected, carefully remove the existing light fitting cover and bulbs. Take your time to inspect the wiring and connections before proceeding to detach the old fitting from the ceiling, using caution to avoid any dangling wires.
- Next, unpack the LED Retrofit Light kit and follow the manufacturer’s instructions for installation. Securely connect the new fitting’s wiring to the existing electrical wiring, matching the colours correctly. After everything is properly connected, mount the new light fitting in place and test it before fully securing it.
Turn Off The Power
Before changing an LED Retrofit Light, it is essential to turn off the power to the lighting fitting at the circuit breaker. This safety measure ensures that you can work on the installation without any risk of electric shock.
Locating and switching off the circuit breaker involves identifying the electrical panel in your home. Most circuit breakers are labelled to indicate which ones correspond to specific areas or rooms. Once you have located the correct breaker, firmly switch it to the ‘off’ position. It is important to double-check that the power is off before proceeding with the installation process.
Electrical safety is paramount during any light fitting installation. Always wear rubber-soled shoes to prevent electric shock and ensure that the work area is dry. It is advisable to use insulated tools to minimise the risk of electrical accidents. By following these precautions, you can complete the LED Retrofit Light installation with confidence and peace of mind.
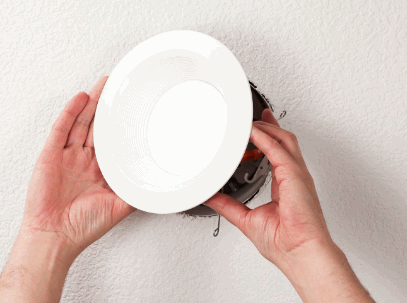
Remove The Old Light
Removing the old light fitting, especially recessed lights, involves disconnecting it from the housing and carefully handling the metal trim or any other components. Proper removal of the old light is crucial for a successful LED retrofit installation.
- When tackling the removal process, ensure that the power source is turned off to avoid any electrical mishaps.
- Begin by locating the trim of the recessed light and gently pulling it down to reveal the interior housing. Use a screwdriver to loosen the screws holding the housing in place, making sure not to damage the ceiling in the process.
- Once the housing is detached, carefully unplug any wiring connections, taking note of their placements to easily reattach them later. Inspect the wires for any signs of damage or wear and replace them if necessary to guarantee a safe and reliable connection to your new LED fittings.
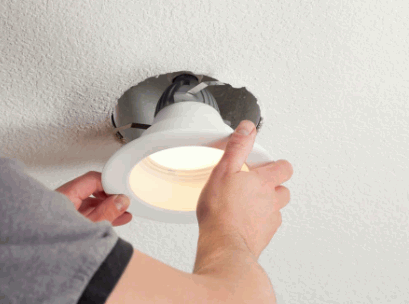
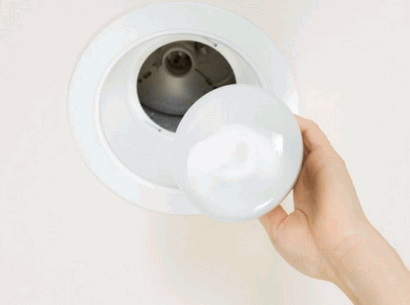
Install The New Light
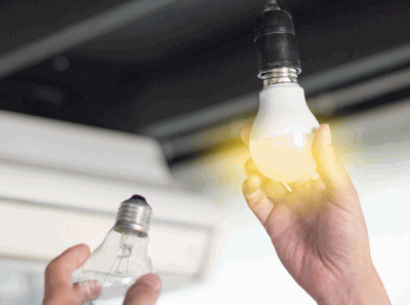
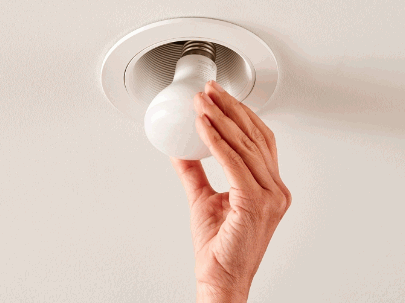
Installing the new LED light involves securing it in place within the light housing and ensuring a proper connection. Whether it’s a screwable bulb or a recessed light, following the manufacturer’s instructions is essential for a successful installation.
Start by turning off the power to the light fitting to avoid any electrical mishaps during the installation process. Next, carefully remove the old light, taking note of how it was fitted and connected. Clean the area where the new LED light will be placed, ensuring a dust-free surface for optimal performance.
Proper alignment of the new light is crucial in achieving the desired lighting effect. Make sure the light is centered and level within the fitting for a polished look. Secure the connections firmly but not too tight, to prevent damage to the wiring.
Turn The Power Back On
After successfully installing the new LED light, it’s crucial to turn the power back on at the circuit breaker and test the light to ensure proper functionality. Basic electrical knowledge can help troubleshoot any issues that may arise.
Once the installation is complete, the next step is to carefully head back to the circuit breaker panel and flip the corresponding switch to restore power to the light. This step is essential to ensure that the light can function as intended. Once the power is on, it’s recommended to test the new LED light by switching it on and off to confirm that it illuminates correctly.
For users faced with any potential electrical problems, it’s crucial to have a basic understanding of common issues that may occur. Checking for loose connections or wiring faults is a good place to start. Examine the connections carefully and ensure that everything is securely in place to prevent any electrical hazards or malfunctions.
What Are Some Tips For Changing An LED Retrofit Light?
When changing an LED Retrofit Light, it is advisable to choose the right replacement light, follow safety precautions such as wearing safety glasses, and consider seeking assistance from a Master Electrician for complex installations.
Choosing the appropriate replacement bulb is crucial as it ensures compatibility with the fitting and prevents electrical issues. Protective gear like gloves can shield your hands from potential hazards when dealing with electrical components.
For intricate lighting projects that require expertise, it’s wise to hire a professional electrician. They can assess the wiring, address any underlying issues, and guarantee a safe and efficient installation process.
Choose The Right Replacement Light
Selecting the right replacement light for your LED Retrofit project is essential for achieving the desired lighting effects. Consider factors such as colour temperature, brightness, and compatibility with existing fixtures when choosing a new LED light.
Matching lighting fixtures with LED options can significantly enhance the overall efficiency and longevity of your lighting setup. By choosing an LED light that complements your existing fixtures, you ensure a seamless integration that maximises the performance of both the fixture and the LED source.
Furthermore, considering the specific applications of your lighting needs is crucial for optimal functionality.
From task lighting in workspaces to ambient lighting in living areas, different settings require different lighting characteristics. Adjusting the colour temperature and brightness accordingly can create the ideal ambiance for each space, promoting productivity and comfort.
Follow Safety Precautions
Prioritise safety when changing an LED Retrofit Light by wearing safety glasses, following proper installation procedures, and ensuring electrical knowledge to handle potential risks. Safety precautions are crucial to prevent accidents.
When embarking on an LED retrofit installation, it is imperative to consider the safety of yourself and others around you. This not only involves protective gear like gloves to safeguard against electric shocks but also requires a thorough understanding of the electrical components involved.
Ensure that the power source is switched off before beginning any installation process to avoid any potential accidents. Inspecting the wiring and connections carefully beforehand can help identify any potential risks and address them proactively.
Consider Hiring A Professional
For complex LED Retrofit projects or unfamiliar electrical tasks, consider hiring a professional electrician with experience in handling lighting installations. A qualified electrician can ensure the safe and efficient replacement of LED lights.
Professional electricians bring a wealth of knowledge and expertise to the table, making them adept at assessing the specific requirements of an LED Retrofit project.
Their proficiency helps in identifying any potential electrical issues that may arise during the installation process, ensuring a smooth and hassle-free experience for you.
By entrusting the job to a skilled electrician, you can also benefit from the precise installation of LED lights, maximising their performance and energy efficiency.
How Do You Dispose Of Old LED Retrofit Lights?
Proper disposal of old LED Retrofit Lights is essential to protect the environment and prevent electronic waste. When discarding old LED lights, consider recycling options or local facilities that accept electronic waste for safe disposal.
By recycling old LED lights, you not only help reduce the amount of electronic waste in landfills but also contribute to the conservation of valuable resources. Many components of LED lights, such as glass, metals, and plastics, can be recycled and reused in the manufacturing of new products.
When looking for recycling options, check with local recycling centres, electronic stores, or municipal waste management facilities. Some manufacturers also offer take-back programmes where you can return old LED lights for proper disposal.
Adopting environmentally friendly disposal practices such as donating used but functional LED lights to charities or organisations in need can extend the lifespan of these products and reduce overall waste generation.